Self-hosted Selling Online
Share This Article
In part 2 of Self-hosted Selling Online, the remaining 5 steps will focus on creating your website and getting everything configured on your web hosting plan, so you can start selling.
If you missed part 1, go to this post, to get the first 5 steps which will help you prepare the content for your site and secure your hosting account and domain name.
Hosting Account
The following steps and images will relate to a hosting plan taken with bluehost, but if you have another plan, although the names of somethings might be different, you should be able to still follow along.
1. Set up E-Commerce Software
The most important part of running your online store is the e-commerce software you use. These software include important features such as:
- shopping cart
- catalog management
- customer management
- inventory management
With most of the webhosting companies I’ve used over the years, there are easy to use modules available to quickly install the software.
To Install:
- login to your webhosting account
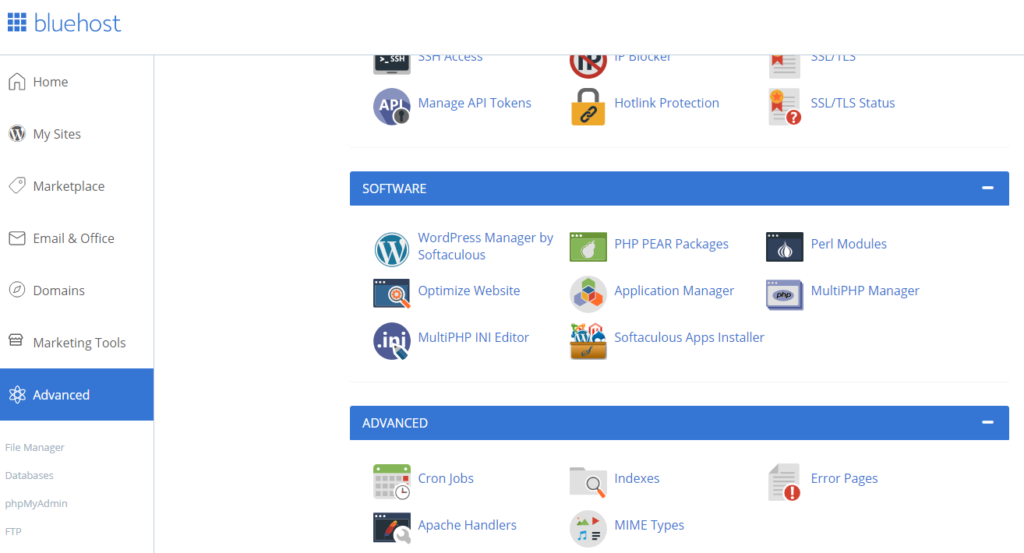
- go to your cPanel or the management interface used by your hosting company. For bluehost click the Advanced link to go to cPanel
- On your cPanel, scroll down the page to the Software section and click on the Softaculous Apps Installer in that section. Another hosting plan might have a different name for this, e.g. godaddy used Installatron, but basically this is a module that allows you to install scripts in your hosting plan.

- On the “scripts” page, there are applications you can install to your site. You will be looking for E-Commerce scripts. Click the link, in the menu to the left, named E-Commerce to see the variety available to you.
- Scroll down the list of E-Commerce options, in the menu, and select Prestashop. This is currently the solution I use for my online craft store, but if you are willing to learn, you can try any of the other solutions. Be sure to explore the various features to pick the best solution for your business.
- Click the Install now button on the page with the Prestashop details. Verify your domain name is selected, enter your store name and change the admin folder name (admin123), to something only you would know. Take note of the email, password, etc in the Admin Account section and alter as needed. You will need this information to login after installation. Click the Install button to start the installation process.
- After installation, review the confirmation page. This page will have the link to your newly installed e-commerce site and the link to your backend portal, where you will manage your site.
2. Add Logo
Now that you have your e-commerce solution installed, you will want to customise your site design.
First up, let’s add your logo.
Login to your backend, using your Administrative URL.
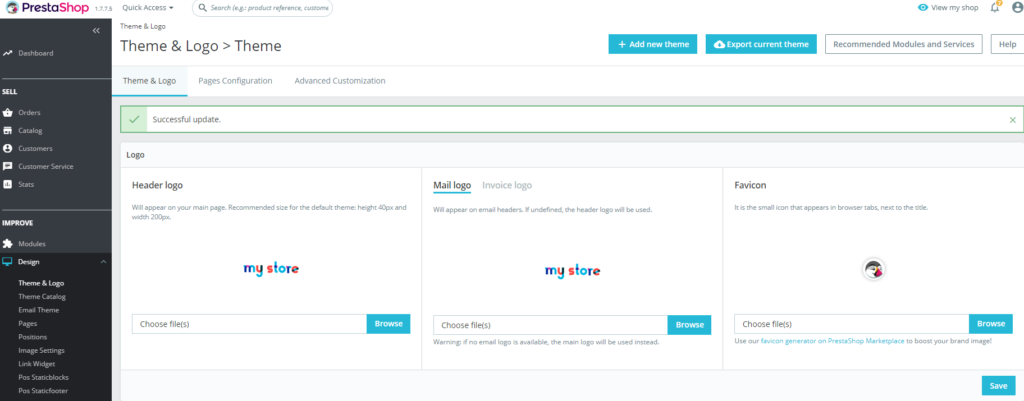
Go to the Design section, which you will see on the left side, and click on the Theme & Logo link. In this area you can upload your logo and your theme.

Use the Browse button to find your logo file and then click the Save button, to complete this process.
3. Site Design
Themes for Prestashop can be purchased from various websites. You can visit Envato Market – Theme Forest, and browse for a design for your site. There are varying prices, so you can get a theme based on your budget. Once you have a theme, go to the Theme & Logo section in your website backend (where you added your logo) to install the theme.
Click the Add New Theme button, in the Theme & Logo section. Under the Import from Computer section, d browse to where the zip file, for your theme, is saved on your computer. Click Save to install the theme.
Once it’s finished installing, you can click the theme and click Use this theme, to make the theme active.
After the install has completed, you can go to your website to see the updated design.
4. Add Categories
Your new self-hosted website is coming along and you’re almost ready to show it to the world. Now you need to add the products you want to sell, but first products need to be categorised.
Login to your backend and click the catalog link to the left. Click the categories menu link to start adding. The categories you add here will make up the menu links of your website. Review part 1 to this Self-Hosted Selling Online post, to get help creating your categories.
Click the Add new category button to add each category, it’s that simple.
5. Add Products
One more major step needs to take place now, and that is adding the products you want to sell to your store.
Go to the catalog menu link and click on products to add the products.
If you finished the activities in part 1 of the Self-Hosted Selling Online post, you would already have some information to start adding your product details. The entries are self-explanatory, so go ahead and start populating your store.
Not the End
So there you have it, the final 5 steps in the 10 step process to getting online.
That was probably a lot, but I really hope you were able to follow along.
If you need more in-depth help building your site, I have created an online course that can help. It is my Build a Website course and I also have a Bootcamp. You will get detailed video tutorials and guidance on how to do everything mentioned and learn how to use this software for your online business. Some of these additional topics will cover managing your online store, setting up payment options, shipping and keeping in contact with your customers and loads more.
If you are excited to start selling online and want to learn more click my course link here to take that next step with me.

